Sunday, 16 November 2014

Autumn/Winter Makeup Inspiration :)

Friends!! hello! and sorry for being MIA for so long!! In all honesty I've just been so busy with life that I haven't had the time (or should I say, I haven't MADE the time) to write posts, but anyway, I'm BACK and I'm going to make every effort to be more consistent and get back on track with doing waht i love to do :)

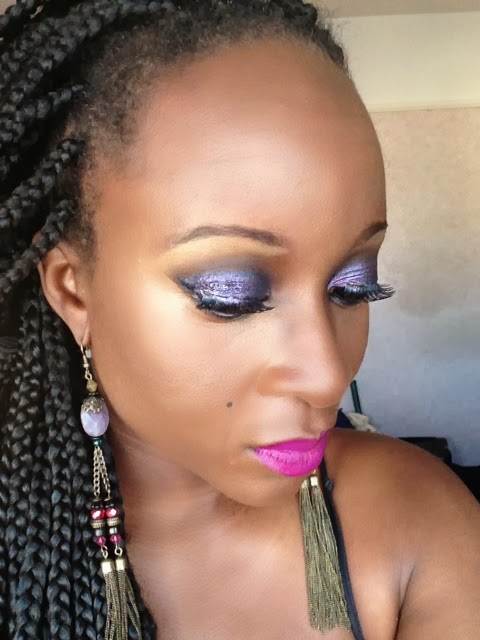
So today I was inspired by a lovely 'Winter' makeup look that I saw on Pinterest, it consisted of a gold smokey eye, with white eyeliner on the inner crease (yes, WHITE) and a deep red lip.

I contoured with my new favourite concealer (it's actually a foundation that I use as a concealer) in Heavenly Honey by Black Opal, I then went over that with Ben Nye Banana Powder.

The look that inspired me is below as well as my rendition of it, and as per usual I've listed all the products that I used :)


Products used:

Eyes:

Swiss Chocolate by Mac in the crease

St Tropez HD eyeshadow by Artist of Makeup Cosmetics (AOM Cosmetics) all over the lid

I then used a dark brown eyeshadow mixed with a little black in the corners

I used a Maybelline mascara and some false corner lashes

I used a white eyeline from NYC

Face:

I used Carob stick foundation by Black Opal

I then highlighted with Heavenly honey stick foundation also by Black Opal

I went over the highlighted areas with Ben Nye powder in Banana

lips:

I had to mix Barry M #156 with a deep purple colour by Jenny Packham, followed by Decorative Lipglass by Mac. I didn't quite get the plum colour I was after, I think I need to look for a nice plum lip liner to fill my lips in first, to get that intense colour; but I'm still happy with the outcome

Thank you for reading and I hope this inspires you :)

Have a good week
Love, you
Jennifer

p.s. my website is on its way, so keep your eyes peeled :)


Tuesday, 20 May 2014

Make-up Classes :)

Hello friends J

I hope you are well J

If you have seen any of my Instagram accounts (@jennk_87 and @loveyoubyj) you’ll see that I have recently started a makeup course! Woohoo, I’m so excited to be doing this course, it’s one of those things that I've wanted to do for a while but I never got round to.

So, I'm doing a Basic Make-up Certificate at Bella Factory London Make-up School; the course covers most of the basics such as, choosing the correct foundation, contouring, highlighting, gel liner techniques and much more! Although I feel that I have quite a good knowledge of these things already from what I've learnt from YouTube and other blogs, I always want to learn new things, learn from others, and make myself better, and I thought this was a good starting point.

You’ll see in my last blog post that I really want to get better at applying makeup on other people and this course has taught me that applying makeup on other people is very challenging; I’ve done it before, on friends and family, but working on someone who you’ve never met is a whole new kettle of fish! It can take quite a while to find, not only the right foundation shade for your model, but also, the shade that they themselves feel comfortable with; and if you’re a perfectionist (like me J ) then you’ll take as much time as possible to get everything right!

Having said all of that I’m really enjoying it!! And it’s really opening up my eyes to what make-up artistry is all about. My teacher, Make-up Artist, Bella, is great, she’s had A LOT of experience in the industry and she’s very knowledgeable; she’s also very straight talking and will tell you if something doesn't look good (if it doesn't) which is what I look for in a teacher.

The course is 40 hours in total and I've done 16 hours so far, and we've covered quite a lot, foundation, contouring, eye contouring/shadowing and gel eyeliner. Some pictures below J Like I said, I'm really enjoying it and this class just makes me want to keep practising and get better and see how far my love of make-up can take me. So watch this space J

Contouring using Foundation done by me :)

 Contouring (by another class mate)
 Filling in eyebrows/eye contouring/shadowing for a 'Bridal look'

 Before and after :)
 Meeeeeeeeeeee :)


Thanks for reading
Love, you!
Jennifer
xxx


Monday, 21 April 2014

Makeup for colourful hair | Pretty Glittery :)

Hello friends!

So this week, I decided to make over two people instead of myself, one of the reasons I decided to blog in the first place, is because I wanted a way to document my progress, and for me, the area I'd like to get better at, is applying makeup on other people, so this week I made over my best friend Hawa and one of my sisters, Rachel.

Sunshine on a rainy day :)
Hawa has Purple and Blue hair, so I wanted to do something that would compliment her hair, but also look quite natural and fairly subtle (hence the nude lips) I gave her a Coral/Orange and Purple smokey eye, with a bit of Gold on the inner crease, I also lined the bottom of her eye with a White eyeliner and then went over it with a Turquoise eyeshadow, just to add a little colour and also make her tiny eyes look a bit bigger, because, lighter colours make things look bigger/bolder. Hawa isn't really makeup wearer, so I was really excited to make her over! doesn't she look lovely :)

With Hawa, I didn't find the application of the eyeshadow as challenging as I thought I would, obviously, I'm mostly used to putting eyeshadow on my own eyes and i'm not used to adapting my skills to different eye shapes and sizes, so I thought I'd struggle to get a good smokey effect, because her eyes are quite small and so I was worried that the eyshadow might overpower her eyes , but I'm very pleased with it and so is she.
It was raining heavily when we did this, so we decided to call this look 'Sunshine on a rainy day!' :)


And  here's a little transformation video for you to enjoy :)


Pretty Glittery :)
And for look number 2, we have Rachel :)

Again, Rachel isn't a makeup wearer, so I wanted to do something, pretty, but subtle, to give her an idea of something she could do if she was going out for a special occasion. I gave her a glittery Gold eye, using Barry M Glitter Dust, underneath that, I used a yellow eyeshadow as a base. To be honest, the glitter did not come out as glittery as I hoped, I used vaseline as an adhesive, but I think I actually need a glitter adhesive,
I wanted the glitter to REALLY stand out, but I still think it looked nice, and so did she :)
I used a natural brown (Swiss Chocolate by MAC) in the upper crease of her eye and I finished with a nude (pink/natural)  lip :)


All colours were taken from my 120 eyeshadow palette (I mentioned this in my previous post) and for both looks, I contoured and highlighted as usual, you can see my previous post on 'how to contour and highlight'.

I hope you enjoy, and if you're looking for makeup for coloured hair, or for a pretty glittery look, I hope this gives you some kind of inspiration.

Thank you for reading
Have a good day
Love, you
Jennifer xx

Sunday, 13 April 2014

Bright Eyes | Summer Make-up :)

Hello again friends,

So this week, I tried some bright eyes with nude lips, again, this look was inspired by one of the Youtubers I follow 'Pretty1234me'. this look was actually on her Instagram (kkamara) AGES ago.

This look was actually quite easy, firstly, I covered my whole lid in dark blue, then I added a bright pink/fuchsia in the upper crease, I then went over that with a dark purple and made it more intense on the outer corners; in the inner corners (tear ducts) of my eyelid I added a shimmery cream/white colour; on my bottom lash line I used a black liner and I added a light green half way and then the blue that I used on the lid for the other half. I finished the eyes of with some falsies  :)

I contoured and highlighted as usual and finished with pink lips, as per my previous post, Lipstick is called Liqueur 775 by Sleek Make up with high sheen lip gloss in Plum Blush by No. 7 on top.All of the eyeshadows I used are from the 120 eyeshadow palette that I referred to in last week's post :)

I think this is a lovely Summery/Spring look and could easily be worn during the day with a lovely little summer outfit. I hope you like it and that it gives you some inspiration for summer make-up.


Thank you for reading
Have a lovely day :)
Love, You
Jennifer
(Instagram: @loveyoubyj)


Sunday, 6 April 2014

Brown/Red eyes with Red and Pink lips and a Flower Crown :)

Friends, I'm back!!!

Apologies for the inconsistency! I had a few issues with my laptop, and then
about 6 weeks ago Blogger decided that it wasn't going to let me upload any pictures, I was trying and trying for weeks.

Anyhoo, I have a look of the day for you! This was inspired by one of my fave make up artists who I follow on YouTube & Instagram, she's called Isoken Asamato, her YouTube alias is Enibaby4 and her Instagram is @verygoodbadgurl. This was inspired by her 'A Nigerian Glow' look.

I've done a smokey brown/red/orange eye with a Red lip and then with a
pink lip. I added a flower crown, just to be a little extra! :) Although, in the picture, my eyelids look quite brown, I did use red and orange in the crease and then a bronze/brown on the lid. For the Red, I actually used a blusher, Raizin by MAC, I've had it for AGES and never really use it! I also used a bright Orange and Red from my new 120 eye palette (a palette of 120 eyeshadows - it costs about £6.99 from Amazon. Just type '120 palette') neither colour came out very strong a. because my brushes were quite damp - I'd just cleaned them, and b. because I blended a lot of brown on top. As you can see, I also added a highlight in the inner crease of my eye, which I think makes all the difference; as with the brown colour, the inner crease colour is from my Au Naturelle eye shadow palette by Sleek Makeup.

I contoured and highlighted as usual, I used a Format blush by MAC which is basically a bronzer, I wanted to keep it simple. I hope you like it!! and you get some kind of inspiration from this, I'm definitely going to try and be more consistent and I'm going to keep on practising new looks with more colours, and of course I'll take pics and let you know what I've used. All products listed below.


Eyes:
In the crease - dark brown, then Format in the outer corner, a little Red and Orange from 120 palette
Inner crease - White/cream shimmery colour from the Au Naturelle palette
Liquid eyeliner by Sleek Make up
False Eyelashes from Eyelure
Brown eye liner pencil to fill in my eyebrows
Black Kohl eyeliner from MAC for lower lash line

Cheeks
Sleek Contour Kit in Medium,Ii used the brown and the highlight colour
Blush: Format by MAC
Sleek Makeup concealer under the eyes, i then set this with Matte Maker Mattyfying Power in 30 Natural Beige by Maybelline

Lips:
(Red)
Lip liner - Cherry by MAC
Lipstick - Ruby Woo

Pink
Lip Liner - Eau la la by sleek in Red Sky night - it's actually a pastel pink
Lipstick - Liqueur 775 by sleek Make up
No. 7 high sheen lip gloss in Plum blush


Thanks for reading!
Feel free to ask any questions/tips and I'll try to help :)
Love, you
Jennifer
Instagram: loveyoubyj
info@loveyoubyj.com

Sunday, 15 December 2013

How to stop your make-up melting off | Oily skin problems


As you would've heard me mention before, I have oily skin. To be honest I don't mind having oily skin, I've heard a bit of oil is good for the skin, it slows down the ageing process. However, one thing I don't like about it, is the fact that my make-up always melts off my face! So, I thought I'd share a couple of things I've recently learnt to help combat this problem!

1. Foundation - When I first discovered make-up, I immediately opted for Mac, Mac everything! Mainly because it's such a popular brand and because at the time, it was one of the few counters to do a foundation in my shade, so I went with it and stuck with it! I paid more attention to the brand than I did to the product itself, I didn't realise that all my foundations have been oil based. However, in recent days I've realised that, water and silicone based foundations are better for my oily skin. I guess it makes sense really. I stumbled across my current foundation Sleek MakeUp New Skin Revive in 'Henna' by accident, I tried it on in the shop because I liked the colour, and i noticed that it felt really light on my skin, I wore it the whole day and noticed that my skin didn't look or feel as oily as it usually does under make up, so for now, I'm happy and I'm sticking with it Smiling face with smiling eyes


2. Primers

So you would've heard me mention Beautifully Matte Make Up Base by No7 in a previous blog. I first learnt about it when i was getting my make-up done for my sisters wedding. I really liked it, so I bought it. It matifies the skin and it acts as a base - making your skin a nice smooth canvas, which makes your foundation look better in my opinion and it also keeps this particular one works to keep the skin oil free, in my experience it doesn't keep the skin matte for the WHOLE day BUT it definitely makes a difference and makes your make up stay on a lot longer than it would without it.


3. Another product I've started using is Milk of Magnesia! Yes, Milk of Magnesia! I read about using it as a primer in many of the blogs I follow and at first I thought it was ridiculous! Who even discovered that a heart burn medicine stops shine and keeps make-up on for longer, but it does!! It works (for me, anyway!) I like to put it on AFTER my matte lotion, I put it on my oilier areas (forehead, nose and cheeks) with a foundation brush or I pour some into the lid and use my (clean) fingers, wait about 2 mins for it to dry and then I apply my foundation; for me, it keeps my make up on all day and drastically reduces shine and melting.


However, like I've said before, ive been told that primers shouldn't be used all the time, their purpose is to fill in/block the pores, so using them all the time could cause skin irritation and spots.

4. Another thing I use is Urban Decays de-slick Make-up Setting Oil-Control Spray. Now if I'm honest with you, and myself, I'm not sure if this works in terms of oil control; again, I first learnt about it when I was getting my make up done for my sisters wedding, I liked the idea of it, so again, in typical Jennifer style, I ran out and bought it!! It definitely sets the make-up, i.e. makes it look more settled on the face as opposed to 'caked' on, but I don't know if it plays a part in helping make-up stay on, but I like it anyway


Hope this is useful:)
Thanks for reading lovelies
Love, you
Jennifer

Sunday, 8 December 2013

Make-up for the Festive Season #2


Hello again!

Ok, so in the interest of sticking with the Festive make-up theme, I came up with 2 looks, one for myself and one for my sister, Rachel. Rachel doesn't usually wear make-up so she wanted something, noticeable yet subtle that she could wear for her work’s Christmas party. I gave her Gold and Brown Smokey eyes with a Pink/Nude lip, this look is very versatile and can be worn on any occasion and it would go with a number of lip shades, especially a BRIGHT RED!! Kiss markKiss mark which is definitely more my style, but obviously it's not about me, it's about Rachel and what likes and what she's comfortable with. She looks lovely, even if I do say so myself! :) I highlighted her cheeks with 'Muscovado' Blush from the Sleek Blush by 3 Palette and also I dabbed a little bit of 'Fantasy' liquid eyeliner from Lush Cosmetics on her cheek bones just to add a bit of sparkle. 


For my look, I contradicted my last post and gave myself bright eyes with bright lips!!
In my last post I said that, ideally either the lips or the eyes should be bright but not both! 
But somehow this really worked! To be honest I think it's because the Blue (eyes) and Purple (lips) compliment each other; I had just bought the lipstick (Mystic by Sleek) so I was trying it out, I hadn't actually intended to do a blue Smokey eye, but I was experimenting with my Sleek Storm Palette and this is what I ended up with. I did a Blue/Black Smokey eye and I put a little bit of Purple glitter on top and finished with Eyelure falsies just to make my eyes stand out a bit more!! I'm very happy with the look!


Smiling face with smiling eyes 


All products used are listed below, hope this is useful! 

Thank you for reading, please like and share (and subscribe ) if you like what you see.
Please follow my new Instagram account: @loveyoubyj

Also, you can now contact me  for bookings at: info@loveyoubyj.com 


Products used on Rachel
 
Face:  
No.7 Beautifully Matte Make up Base Sleek Makeup New Skin Revive Foundation in 'Henna'
Benefit pressed powder in ‘Nutmeg’
Sleek Makeup Corrector and Concealer Palette
Sleek Makeup Face Contour Kit in 'Medium'
Sleek Makeup Blush by 3 in 'Sugar' (Muscovado)
Gold Glitter ‘Fantasy’ Eyeliner by Lush Cosmetics
  Eyes:
  Sleek Makeup iDivine Eye Shadow Palette in Vintage Romance (Dark Gold)
Mac Eyeshadow in ‘Embark’
Mac Eyeshadow in ‘Swiss Chocolate’
Scandaleyes Eye Shadow Stick in '008 Blackmail'
Sleek Gel Eyeliner in ‘Dominatrix’
Eyelure Lashes
 
Lips:
Lush Cosmetics Lipstick in 'Perspective'
No7 High Shine Lip Gloss in ‘Plum Blush’
Sleek Lipliner in ‘Red Sky Night’
Products used on me
Face:
No.7 Beautifully Matte Make up Base
Sleek Makeup New Skin Revive Foundation in 'Henna'
Sleek Makeup Corrector and Concealer Palette
Sleek Makeup Face Contour Kit in 'Medium'
Revlon Photo Ready Skin Illuminator in Dark
Sleek Make-Up Luminous Pressed Powder in No. 04
 
Eyes:
 
Sleek Makeup iDivine Eye Shadow Palette in Storm (Blue Shimmer, Black) Scandaleyes Eye Shadow Stick in '008 Blackmail'
Mac Eyeshadow in ‘Swiss Chocolate’
Sleek Make-up liquid Liner
Eyelure Lashes
 
Lips:
Beauty Forever Lip Liner in ‘Currant’
Sleek Matte Lipstick in Mystic
 
Thank you!
Love, you
Jennifer 
Xxx


Sunday, 1 December 2013

Make-Up for the Festive Season


So I originally had another post prepared for today, however, seeing as it's the 1st of December, I changed my mind and decided to do a 'Festive Make Up' post instead!!

I'll try to make this the first of a few Festive Make-up posts.  This look was inspired by the 'Galactic Party Season' look by one of my favourite make-up artists who I follow on YouTube, Jennie 'beautybyjj' Jenkins. However, I've put my own spin on it to make it a little more subtle.

For me, when i'm trying to look festive or extra glam, I like to use GLITTER! Personally, I think glitter always makes things that little bit more festive! Here, I started with a purple shimmery eye shadow all over my lid then black glittery eye shadow on top, finished with green/purple glitter dust on top. I filled in and highlighted my brows and topped it off with winged eyeliner and Ardell False Lashes (I prefer Eyelure but I ran out).  I did my usual foundation, highlighting and contouring routine that I've mentioned in my previous posts, I then did a pale pink/nude lip !

Because the eyes are quite dramatic I think nude is the most appropriate lip colour, if I'd done a bold lip, my lips and my eyes would both be fighting for attention and that's definitely not what you want! You want the lips OR the eyes to be the main focus.

I think this look would look great with a gold, green, black or even white dress!

Here is a list of the products I used


Products

 Face:

 No.7 Beautifully Matte Make up Base

Sleek Makeup New Skin Revive Foundation in 'Henna'

Sleek Make-Up Luminous Pressed Powder in No. 04

Sleek Makeup Corrector and Concealer Palette

Sleek Makeup Face Contour Kit in 'Medium'

MAC Mineralize Skin Finish in 'Gold Deposit'

Sleek Makeup Blush by 3 in 'Sugar' (Turbinado & Demerara)

 
Eyes:

 
Sleek Makeup iDivine Eye Shadow Palette in Storm (Purple Shimmer)

Sleek Makeup iDivine Eye Shadow Palette in Vintage Romance (Black glitter)

Scandaleyes Eye Shadow Stick in '008 Blackmail'

MAC Eye Kohl in 'Smolder'

MAC Eye Shadow in Swiss Chocolate (in the crease of my eye)

Ardell False Lashes

Barry M Fine Glitter Dust in '85' (Green, Purple, Gold)

Sleek Make-up liquid Liner

Lips:

Lush Cosmetics Lipstick in 'Perspective'

I went over this in Sleek Matte Me Lip Cream in ‘Petal’
Then I went over this in a very old nude lipgloss that I can’t remember the name of.

Hope this is useful, especially for darker skinned lovelies wanting to experiment with colour.
Thanks for reading!!
Love, you
Jennifer x

Sunday, 24 November 2013

Day make-up vs. Night make-up


So I thought I'd share an everyday look and a glam night time look with you all.

Day Look

So, for my day time look, I've done a purple/pink smokey eye with winged eyeliner, I subtly highlighted, contoured and blushed (although it's a lot more visible in person, but the lighting in my house isn't great) and I finished with a nude/pink lip. The perfect look for a sunny Winter's day :)


Products

Face:

No.7 Beautifully Matte Make up Base
Sleek Makeup New Skin Revive Foundation in 'Henna'
Fashion Fair Pressed Powder in 'Walnut Noisette'
Sleek Makeup Face Contour Kit in 'Medium'
MAC Mineralize Skin Finish in 'Gold Deposit'
Sleek Makeup Blush by 3 in 'Sugar' (Turbinado & Demerara)

Eyes:

Sleek Makeup iDivine Eye Shadow Palette (Purple)
Scandaleyes Eye Shadow Stick in '008 Blackmail'
MAC Eye Kohl in 'Smolder'
MAC Eye Shadow in Swiss Chocolate (in the crease of my eye)
YSL Mascara in 'Baby Doll'

Lips:

Lush Cosmetics Lipstick in 'Perspective'
No.7 Lip Gloss in 'Plum blush'


Night Look

For my night look, I wanted to make things a bit more dramatic, so I did a glittery Black Smokey eye, first using a glittery Black eye shadow and then I put glitter dust on top. I highlighted underneath my brows with concealer and used Eyelure lashes for the dramatic effect. I made my contouring, highlighting and blush a lot more prominent than I did in my daytime look and I finished with a bright Red lip!! This would be the perfect look to go with a little black dress! Kiss mark


 Products

Face:

No.7 Beautifully Matte Make up Base
Sleek Makeup New skin Revive Foundation in 'Henna'
Fashion Fair Pressed Powder in 'Walnut Noisette'
Sleek Makeup Corrector and concealer Palette
Sleek Makeup Face Contour Kit in 'Medium'
MAC Mineralize Skin Finish in 'Gold Deposit'
Sleek Makeup Blush by 3 in 'Sugar' (Turbinado & Demerara)

Eyes:

Sleek Makeup iDivine Eye Shadow Palette (Black)
Scandaleyes Eye Shadow Stick in '008 Blackmail'
MAC Eye Kohl in 'Smolder'
MAC Eye Shadow in Swiss Chocolate (in the crease of my eye)
Eyelure False Lashes
Barry M Fine Glitter Dust in '22' (Black and Gold)
Typically I would've used a liquid Eyeliner, but I couldn't find it.

Lips:

I lined and coloured my lips in with Red lip liner, it's by 'Beauty Forever' and it's just called 'Red'
I used Rimmel Lipstick in 'Tantrum'

Hope this is useful, especially for you darker skinned lovelies :)
Thanks for reading, feel free to ask any questions in the comments box
Love, you
Jennifer

Saturday, 23 November 2013

Cleansing, Toning, Moisturising and Oil Cleansing | Skin Care for Normal to Oily Skin


I have oily skin, with HUGE pores, so Cleansing, Toning & Moisturising are very important ESPECIALLY after wearing make-up. On a normal, no make-up wearing day, I (try) to C,T&M morning and night.

Cleansing

In addition to being oily, I've got quite sensitive skin and my current favourite Cleansing product is
'9-5' by Lush Cosmetics. It really works for me, it's full of natural goodness, including Almond Oil, Orchid Extract and Ylang Ylang; it's very easy to use, I put it on a cotton pad and cleanse in downward circular motions and it visibly lifts away all the dirt.

Toning

After Cleansing, toning is essential!!  About 8 years ago, I did some part-time work on a beauty counter and whilst training for this position I learnt how important cleansing is, and it's stuck with me since then. The job of a cleanser is to remove dirt & oil from your skin and from inside your pores, from the moment the cleanser touches your skin, it's already started cleansing, now, this is all good, however, even when your make-up and dirt have been removed from your skin the cleanser is still working! So, essentially if you don't remove the cleanser residue from your skin, it will continue to cleanse and subsequently, it'll keep removing the natural oils in your skin which could cause skin irritation and/or blemishes. Additionally cleansing has a warming effect on the skin, and anything warming on the skin, increases elasticity and opens the pores.

SO, the point of a toner is to 1. remove the excess cleanser that is no longer needed and 2. Cool your skin down to restore firmness and close the pores. My favourite cleanser at the moment is
'Eau Roma Water' again, by Lush Cosmetics, it's main ingredients are Lavender Water and Rose Water, both are very gentle and very cooling.

Although I love this as a Toner, another (free) alternative is cold water! Simply rinse your face with cold water or run a cotton pad under a cold tap and gently rub it on your face, this does the exact same job! It removes residue and cools your face down.

Moisturising

Because my skin is oily, I often struggle with moisturisers; however I don't place too much emphasis on moisturisers, I kind of just use whatever I have to hand at that moment, whether it's coco butter or 'Simple' face moisturiser or any Lush face and body moisturiser. In my experience, WHAT you moisturise with isn't too important, you just need to make sure that you DO moisturise. Of course this statement is relative, but the point is, once you remove moisture with a cleanser (and toner) you need to restore it and as long as your chosen moisturiser doesn't dry out your skin or make it too oily, then you're fine, just make sure that you DO moisturise. Moisture is actually good for the skin, just not too much.

Oil Cleansing

Now, in my personal experience, oil cleansing works wonders!! If you don't know what it is, it's simply using oil to cleanse and remove make-up. Personally, I only do this form of cleansing, if I've been wearing make-up. If I haven't been wearing make-up, I just do the routine I mentioned above (C,T,M).

I usually remove my make-up with face wipes but from my experience, although face wipes APPEAR to remove make-up they don't seem to lift all make-up out of my pores, so I like to give my skin a DEEP cleanse to make sure all make-up is removed and my pores are fully clean, hence, I Oil Cleanse.

So, to Oil cleanse, I use a face wipe or two to remove the majority of make-up, then, I massage pure Almond Oil (or Olive Oil if I run out of Almond Oil)  into my skin, run a face towel under hot water, squeeze the water out and then wipe away the oil, I do this 3-4 times, and it really works, better than any other make- up remover I've used before; after this, I usually use a very light moisturiser (but not everyone needs to moisturise depending on how the oil feels on your skin), I don't tone because pure oil is good for the skin so it's fine to just leave it on the skin overnight.

In the morning, my skin is visibly brighter and smoother and I find that this form of cleansing soothes breakouts. It sounds illogical to use oil on oily skin, however, oil attracts oil, I don't really know the science behind it, but it works for me, the Almond Oil attracts and pulls out the oils from my make-up (most make-up contains different types of oils). You don't have to use Almond Oil, I've also used Olive Oil and Avocado Oil, they're all just as effective as each other

Finally ... Face Masks

I LOVE face masks, they definitely help to reduce break outs and they keep my skin bright. I must say I'm a fan of most Lush Cosmetics Fresh Face Masks, particularly 'Cosmetic Warrior'; however, for the sake of variation I'm currently using 'Blue Corn 3in1 Deep Cleansing Face Mask' from The Body Shop, I like it a lot, it's a mask, cleanser and a scrub, it leaves my skin very soft and bright after leaving it on for about 20 minutes. However I must say that it doesn't feel as gentle as the Lush ones, it feels a bit chemically, but it definitely works. I usually use it once or twice a week or after a long bout of wearing make-up.

Thanks for reading
I hope this is useful :)
Love, you
Jennifer

Thursday, 21 November 2013

Basic Contouring & Highlighting for darker skinned beauties


If you're reading this, I'm sure you're quite familiar with what contouring and highlighting are, if not, in simple terms, 'contour' means to give something shape. If you wear foundation you might have noticed that after you've applied it, your face looks very one dimensional; if you typically have high cheek bones, you might notice that they don't look quite as high when your foundation is on. SO, the way to get around this is to 'contour' i.e. add the shape and shadows back to your face. You can contour with anything darker than your skin tone, preferably something matte like an eye shadow or a matte powder foundation; the reason why your choice of contour has to be darker than your skin is because, darker colours make things look slimmer and lighter colours make things look more prominent (or in other words, bigger), so the key is to highlight the areas that you want to look more prominent and contour/darken the areas you want to make less prominent i.e. cheeks, nose and forehead

I've been contouring & highlighting for quite a long time, however I've only recently discovered how key concealer is in the whole process. So, I decided to post this to show how and where I do it:

Step 1) Using (clean!) fingers, I prime my face with No7 ' Beautifully Matte - Make up Base ' I really like this base/primer, it works for me and my oily skin (I'll elaborate more on Primers for oily skin in another post)  I try not to use Primers too often because they block your pores and using them everyday could cause breakouts

Step 2) Apply my foundation. In this picture, I'm wearing Mac Studio Fix Powder Foundation in NW50 (since this picture, I've started using Sleek Makeup New Skin Revive in 'Henna' which I  prefer and I personally think it works better for my oily skin)

Step 3) Using a concealer brush, I apply Sleek's Correct and Concealer Palette (couldn't find a link for this) to my under eye, down the bridge of my nose, on my Cupid's bow (the little bit above my lip) and my chin - you'll see this in Pic 1 - the purpose of this is to highlight the places that I want to accentuate/draw the light to and these are also the places with the most bone structure i.e. you wouldn't highlight your nostrils or your cheeks, instead you'd highlight where the bone is i.e. the bridge of the nose and the cheek bones

Step 3) I rub it all in with my (clean) fingers, then I contour using Sleek Face Form Contour Kit in Medium which I love (I'll do a Why I love Sleek Make Up Post soon) !! To do this I simply make a fish face (suck my cheeks in) and put a brown line just on/under my cheek bones using my C454 Contouring Brush from Crown Brush that I referred to in my previous blog post. You should be able to see this subtle line in pic 2. I also contour my forehead (along my hair line) to add a slight shade to it to make it appear less prominent (this isn't necessary for everyone), my temples and my nostrils and the sides of my nose

Step 4) I then apply a pressed powder on my whole face with my KB8 Angle Kabuki Brush from Crown Brush (In this picture I used a powder by Fashion Fair but I think this is now discontinued) and use Mac Mineralize Skin Finish in 'Gold Deposit' over the areas where I put the concealer. I enhance the contoured effect by enhancing my cheek bones even more with  Sleek Makeup Blush by 3 in 'Sugar' which I LOVE!! it's subtle but very warming and adds a glow, it's perfect for women of colour or women with a tan, I blend all 3 shades and sweep just above the contour line on my cheeks and blend it subtly in the highlighted area. the point here is that from the contour line the colour should go from dark to light to lighter (you should see what I mean in pic 2) I then finish the rest of my make up with eyeliner (Sleek Make Up) mascara (YSL Baby Doll) and a nude lipstick (Perspective by Lush Cosmetics) with a bit of clear lip-gloss on top and VOILA done! (pic 3)

Hope this is useful :)
Thanks for reading
Love, you
Jennifer

Saturday, 16 November 2013

Affordable Make-up Brushes


So, I recently went to a make-up master class and the Make-up Artist running the class advised on where to go for cheap (but quality) brushes and one of the places she suggested was Crown Brush and I must say, I'm impressed.

I bought 6 brushes for a total of £34.53 incl. vat and postage, they arrived within about 3 days and although I haven't actually used them yet, the quality appears to be just as good as my Mac brushes

Here's what I bought:

BK42 Bullet Crease brush £2.49
C109 Mini Bronzer brush £4.89
C330 Blending Crease brush £4.69
C454 Angle Contouring brush £4.99
IB114 Oval Camouflage brush £3.99
KB8  Angle Kabuki brush £6.49
SS020 Synthetic Precision Crease £3.99

Happy customer :)


The Key to Real Beauty

Hi! and welcome :)


Before getting started on the wonderful world of make-up and beauty, I wanted to make a point of ensuring that my first (ever!) blog post addresses the reasons behind my blog name 'Love, you'. It didn't take a long time for me to come up with the name, reason being, as I've gotten older and been through many life experiences, I've learnt that the key to beauty really is quite simple - loving you.

Yes, loving yourself!!! Not in an arrogant, delusional or conceited way, but in a REAL flaws and all way! So in the context of make-up and beauty, of course there are cases where make-up is used to cover up particular skin issues etc. and I'm not saying this is wrong in any way, but putting these cases to one side, personally, I believe that if you choose to wear make-up it should be used to enhance the beauty you already have, it's not a mask or a trick.

For me, make-up is something I enjoy, I think it's fun! it makes me look more 'polished', but to be honest, I only wear it, hmmmm 40% of the time (don't get me wrong, I'd be saying the exact same thing if I wore it all day everyday) mainly because I don't always have the time, or I can't be bothered but mostly because with or without it, I love myself. Loving myself includes knowing and accepting that I'm far from perfect, embracing the good things and working on the things I'd like to change about myself (note I said 'I'd like to change about myself' and not 'what other people would like me to change') and loving and respecting myself just the way I am.

This is definitely easier said than done, of course, but anything on the inside will definitely surface, and if you truly love who you are from the inside, it'll naturally come to the surface for all to see and this in itself is such a beautiful thing :)

Anyway, with that said
Love, you
Jennifer x